Showing posts with label graphics. Show all posts

2010-11-25

Unplot.py: from plots to tabular data

Recently, when doing backups, I noticed a script on my hard drive, which I think may be useful to someone else. It takes an image with a line plot and generates a data file for that plot. So it does an operation inverse to plotting, i.e. unplotting.

Download: unplot.py.

The script is available on bitbucket. Feel free to improve.

To run the script, you first need to decide which part of the plot image you want to scan, and what values the pixels correspond to. I prefer to use Gimp or Geeqie to find pixel coordinates.

If there are many lines on the same plot, You may also decide to colourize the line you are interested in with some distinct colour. Use Gimp if necessary. Write down the colour's HTML code.

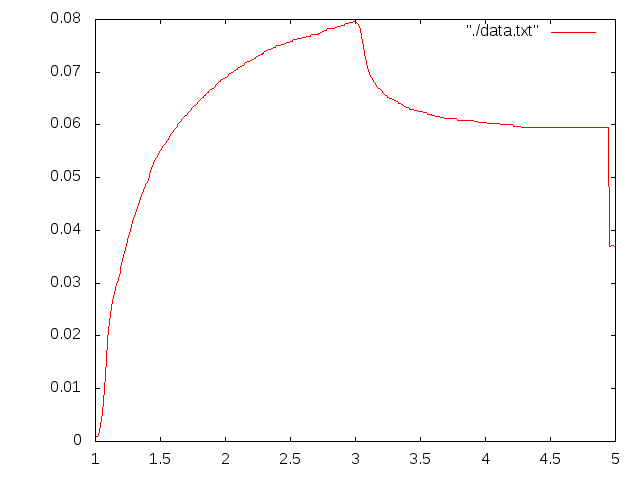
This plot is a good point to start:

colourized plot

Then you can run the script against it. In the directory with the script, run:

./unplot.py "#00ff00" 0 151 0 475 5.0 824 0.09 85 /path/to/plot.png > /path/to/data.txt

The first parameter is the HTML colour code of the line to select. Then there is the values and the pixel coordinate of the bottom left corner of the plot: X value, X pixel coordinate, Y value, Y pixel coordinate. Then the same for the top right angle. And finally the name of the file with the plot. The output is redirected to the text file. Please note that the origin of digital images is usually the top left corner.

After running the script try plotting the data once again to make sure you selected the right colour and region. I went too far to the right in this example and the green letters were mistaken for the part of the plot.

In Russian: unplot.py: извлекаем табличные данные из графиков.

2009-05-21

Animated gif to avi/flv

Using gifsicle to unoptimize the animated GIF and split it into frames, and ffmpeg to build a video:
gifsicle -U --explode "input.gif"
for f in *.gif.* ; do mv "$f" "$f.gif" ; done
ffmpeg -r 25 -i "input.gif.%03d.gif" -sameq -s 320x240 output.flv
If we need to do some padding with black:
ffmpeg -i input.file -s 320x180 -padtop 30 -padbottom 30 output.file
UPDATE: With newer ffmpeg (for example, ffmpeg 0.6.90), this becomes:
ffmpeg -i input.file -vf "scale=320:180,pad=320:240:0:30" output.file
I don't use convert (ImageMagick) to split frames, because gifsicle appears to work faster and require less memory.

(читать по-русски)

2008-02-05

Effective conversion from raster to EPS

There are several ways to use raster images (JPEG, PNG, TIFF) in LaTeX. Fortunately, PDFLaTeX supports JPEG and PNG directly. However, sometimes one has to use only EPS (PostScript) images. This post tells how to “vectorize” the raster effectively.

Out of the several conversion tools (ImageMagick, GIMP), the most effective, IMO, is sam2p. It produces the smallest EPS possible. sam2p is available in Debian repositories.

sam2p is a command line tool. To convert a PNG file image.png to EPS file image.eps do:

$ sam2p image.png EPS: image.eps

I have tried converting some Google Earth screenshots (they are fairly complicated images with a lot of details). These are the sizes of original PNG and of converted EPS images (with ImageMagick's convert and with sam2p):

$ ls -rSsk1 google-earth-screenshot*
1756 google-earth-screenshot.png
3016 google-earth-screenshot-(sam2p).eps
4304 google-earth-screenshot-(convert).eps
Certainly, sam2p-produced EPS is larger than PNG, but it is much smaller than convert-produced EPS. On some images the difference may be even bigger.

BTW, EPS produced by sam2p is EPSF-3.0, and should be compatible with the most of vector graphics software. It seems like often using sam2p may be a better option than using built-in import raster tool. At least when the size of the file matters.

Another tool for effective conversion from raster to EPS is bmeps, but I have not tried it.

P.S. I wrote this post also in Russian: Эффективная конвертация растра в EPS или PDF.

2008-01-15

Try Exposure Blend plugin for GIMP to fake HDR

Digital cameras have relatively narrow dynamic range with respect to human eye, i.e. the difference between the brightest and the darkest grades of light the camera may capture in one shot is limited. This is the reason why some stunning scenes become badly exposed photos (with absolutely black and white areas).

There is a technique to overcome this techinical limitation of modern cameras, known as High dynamic range imaging (HDR). This technique is based on taking several pictures of exactly the same scene with different exposure levels. Then the amount of light per pixel is calculated based on all images. Finally, a combined image is produced, where information about dark areas is taken from the brigher images, and information about brighter areas is taken from the darker images. These combined images often look very good.

In GNU/Linux there is a number of Free tools which support this technique. In particular, I want to mention Cinepaint (HDR in Cinepaint tutorial) and Qtpfsgui (HDR in Qtpfsgui manual).

You just need a camera bracketing support and a tripod to start making HDR images.

However, most modern consumer-level cameras take at most 3 shots in bracketing mode, and exposure step between the shots is often limited to ±2 EV or even ±1 EV (like in my camera), which allows only slightly extend the camera's dynamic range using HDR technique.

In this case it is often easier and faster combine those three images taken with a camera using Exposure Blend plugin for GIMP (the site seems to be temporarily down, in Debian Exposure Blend plugin is part of the gimp-plugin-registry package). This is not a true HDR, but it allows to take dark details from the brighter image, and bright details from the darker image. The result is good enough, because even true HDR based on three images shot with a consumer-level camera with ±1 EV bracketing wont look much better.

In GIMP you may run the plugin from menu Xtns / Photo / Exposure Blend. Give the filenames of the three files you want to merge. All the other settings are likely OK by default.

You may get better results if your camera supports bigger bracketing step. Unfortunately, my camera does only ±1EV, which is not enough.

So I have taken a slightly different approach in the next example. I shot one image in RAW format (12 bit per color channel), and then post-processed it with UFRaw, producing three images with 0±2EV exposure correction.

Now see the results:

candle normal + candle dark + candle bright = candle blended

Just compare the original image to the composite image obtained after exposure blending (below):

Compare normal shot (above) with Exposure Blended composite image (below)

In exposure blended image the dark details are more distinct than in the original image: compare the background, the balls, the suface. Still in the bright areas there are also more details too: compare the wax of the candle. And this is with just few clicks!

I did not correct gamma, color or curves on purpose. One of the key advantages of exposure blending over HDR is that unlike in HDR in exposure blending the tone and the colors are preserved. No need to tweak tone mapping parameters. Exposure blended images always look natural.

Take a look at other Exposure Blended photos at Flickr:
Exposure Blend example 3 Exposure Blend example 4 Exposure Blend example 1 Exposure Blend example 5 Exposure Blend example 6 Exposure Blend example 2 and other photos tagged as exposureblend

P.S. I have wrote this post also in Russia, see Плагин для GIMP Exposure Blend вместо HDR